Montag, 30. September 2013

Halloween Mini Album feat. Summer Witch (Wicked Designs)

This is a mini album that I made for a blog challenge over at WickedlyTwistedCrafter so you can go over and check the details yourself...

The album I created after the tutorial from Cindy4kiddos on you tube. I used some orange cardstock (2 sheets 12x12) and all the designer paper is from October Afternoon, Witch Hazel collection. For the cover I also used some yellow cardstock and my star circles die from Spellbinders and Summer Witch from Wicked Designs.


This is what the front cover looks like...


I colored Summer Witch with my spectrum noir markers (and Copics).

skin - E00, E000 (my only copics...)
hair - IG9, IG8, IG3
eyes - IG8, glossy accents
mouth - CR3
dress - LV3, LV2
corsage - PL2, PL1
tights - LG2, LG1
boots - IG8, IG2, LG2, CT4
cape - CG3, CG2
broom - TN5, TN3, GB1, CG3, CG2


The overview of the front side, I added a pocket on the bottom left square and put some postcards from the same line inside. I also added some dimensional stickers that I received.


And the overview of the back side... Here I added a pocket in the middle square and made a belly band on the bottom left square to add some more postcards and tags.


Detail of the belly band with the folded tags inside...


And a detail of my favorite dimensional sticker -  I couldn't help myself but laugh...

I hope you like my project. I had much fun creating it, so I guess you can keep an eye out for some more of those minis...

Have a wonderful day!

Sonntag, 29. September 2013

X-mas Cards

I had a head start at making christmas cards this year. I already finished 30 to send to friends and family. As most of them don't really appreciate handmade cards, I kept them really simple and quick, so I can spend more time to make cards for people that appreciate it... I used papers from several different christmas papers, mostly from My Minds Eye. Last year after Christmas I purchased some netting that I used behind the patterned paper. I embossed the stamped image with gold glitter embossing powder.

The stamp is from MFT Seasonal Sentiments. The tree actually says: Have yourself a merry little christmas.


Samstag, 28. September 2013

2nd project for LBBS


This is the card I created as a guest designer. I started with a pre made card base and layered a sheet from Crate Paper, Maggie Holmes on it. I used a knock out punch on the green paper which is from Amy Tangerine, Ready Set Go. On top of that I added some self adhesive lace and some WOC flowers. I used the Ragdoll Sweetheart big sweater and glued her on a piece of First Edition Paper, Isabelle.


I colored the Ragdoll Sweetheart big sweater with my spectrum noir markers:

skin - TN2, TN1, EB1
hair - EB5, TN7, TN5
sweater - TB2, TB1
dress - HB3, HB1
tights - PP1, PL1
shoes - IG8

The sentiment I used is from Amy R, Be Happy Sentiments.

Freitag, 27. September 2013

3 Simple Cards


Today I want to share 3 simple cards I made for a you tube challenge. So, let's jump right in.

For my first card I used 3 different stamp sets from Lawn Fawn: Critters in the Forrest (for the owl), Critters on the Savanna (for the hi there) and Blue Skies (for the inside sentiment (thanks) and the hot air ballon). For the paper I used the 6x6 echo park "All about a boy". I just used one sheet for both the a and the b side.


I colored the owl with my coloring pencils.

For my 2nd card I used yellow cardstock that I die cut with my Sissix stars dies in 2 different sizes. I also used my impression obsession stamps: Craquelure and woodgrain. For the Craquelure I used Memento Cantaloupe ink for the big star and Love Letter for the smaller one. The woodgrain I stamped with Tangelo Memento ink. 
The sentiments are both stamped with Love Letter and I used the Lawn Fawn Lucky Stars (for the outside) and the Blue Skies (for the inside).


For my 3rd and last card for today, I used the Stamps of Life awards2stamp set. I stamped the ribbon in Cottage Ivy (Memento) and the inside circle with Pear Tart. For the background I used 3 different star washi tapes, which I also used for the inside.


Hope you like my cards! Comments are very appreciated.

Donnerstag, 26. September 2013

B-day cards with LBBS images

Today I want to share 2 birthday cards I made recently. Both images I used are digi images from Little Blue Button Designs. For my first card I used Watering Plants Ivy and the Ready set go collection by Amy Tangerine. I layered some papers from the collection and added a lace bow on the top right corner. I colored my image with my spectrum noir markers and added some stickles to the flower and some glossy accents to the eyes, the shoes and the water.


skin - TN2, TN1, EB1
hair - EB8, EB5, TN7
hat - TN5, TN3
dress - CT4, CT2, CT1
watering can - DR3, DR1
shoes - TN5, TN3
water - IB1, blender
flower - CT4, CT2, BT1

For the inside I just added another strip from the paper and cut out a label with my lifestyle craft nesting die, where I stamped my sentiment on. The rest I left plain so that I have plenty of space to write my own message.


For the second card I used Miss Lilly Chef. I created a really simple scene using paper form the 5th and frolic collection by Dear Lizzy and the wide woodgrain washi tape (for the floor). I cut out some rectangles with grey cardstock and drew a cupboard and a table/work station on them. I also stamped the sentiment form the ladybugs2love (The Stamps Of Life) on the top left hand corner. I colored my image with my spectrum noir markers and added some diamond stickles on the hair ties, the apron and the top of her socks. I also added some Burgundy Stickles on her bowl.


skin - TN2, TN1, EB1, CR3
eyes - EB5
hair - EB8, EB5, TN7
dress - TB3, TB2
apron - TB3, TB2
socks - BT1, blender
bowl - DR5, DR1, BT1
hat - TB3, TB2


So, that's all for today...! Hope you like my cards and I appreciate all your comments!

Mittwoch, 25. September 2013

Sugar n'Spice Marci

This is the card I made for my mum's birthday. It's coming up in October, so I wanted to be prepared. I tried to do a little scene card, but I found out that I need to get some more stamps with kitchen theme to do it propperly... So it turned out quite simple.

I used the 5th and frolic collection by Dear Lizzy for my background paper. Then I added some woodgrain washi tape to create the floor. I couldn't use it on the whole with, as I didn't want to cover the design on the page. With some grey cardstock I drew a cupboard. I added some lace for texture and interest. I stickled the collar and the hairbow with Diamond stickles and the cupcake icing with icicle stickles. To the heart I added some Burgundy Stickles.


I colored Marci with my spectrum noir markers:
skin - FS9, FS4, FS2, CR3
mouth - CR3
hair - GB5, GB4, GB1
dress - TB3, TB2, BT1, blender
apron - BT1, blender
cupcake - TN1, PL1, DR1
shoes - TB3, TB2
socks - BT1, blender
headband - TB3, TB2
spoon - IG3

Hope you like my card and leave a comment!


Dienstag, 24. September 2013

Sympathy Card

Today I want to share a sympathy card that I made. I always struggle to make those... So I hope you like it.
I used the Bo Bunny Enchanted collection for my background paper and I punched several monarch butterflies with my Martha Steward punch. I also used the Labels Four die from Spellbinders to place my sentiment on. For the sentiment and the butterflies I used tan and red cardstock. To ground the sentiment I used some lace I had in my stash for quite some time, so I do not know, where I got it from.


For the Inside I used another strip from the same paper and also added a red butterfly. The rest I left blank so that I can add my own message.


Hope you like my card and let me know what you think!


Montag, 23. September 2013

Fist attempt at Halloween Cards...

I just wanted to share my first attempt at creating some halloween cards. I got the stamp set from our craft lounge when they got out of business, and it was so cute I just had to have it, even though we don't celebrate halloween... I'm really into stamping my own background at the moment and I used black card stock that I stamped with some orange pigment ink with the impression obsession stamp thin chevron. Also for both cards I used purple and white and also green and white bakers twine from American Crafts.

For my first card I die cut the black card stock with my opulent ovals die from Spellbinders. I put the ghost on dimentionals and wrapped the twine around the card.


I used my BT1 and Blender pen from my Spectrum noir markers to add some dimension to the ghost and I colored the moth with CT1.


On the inside I used one of the sentiment stamps from the ghostly Greetings set and also the jack-o-lantern to add some details.

For the second card I used the Spellbinders Labels Eighteen die for my black cardstock. I also wrapped the twine around the card and put the ghost on dimensionals. I also stamped a sentiment from the set on the front with purple pigment ink.


The colors I used were:
ghost - BT1, Blender, CT1
pumpkin - OR3, OR2, CG3, CT2, CT1


On the inside I used some more stamps from the set. The candy corn and wrapped candy where a small stamp, that I stamped repeatedly to create a border at the bottom of the card.

Sonntag, 22. September 2013

The Greeting Farm Gracie (FFF)

I just wanted to share the card I created for the Farm Fresh Friday Challenge over at The Greeting Farm. I used TGF Gracie as my main image. The papers I used are all form the 5th and frolic collection from Dear Lizzy. I used the cut apart sheet to paper piece the whole outfit of Gracie and the rest of the cut appart I used on the card as well, to add some interest. I also used a arrow paper clip from IKEA and some pink glitter tape from AC.


I colored Gracie with my spectrum noir markers and I used the following colors:
skin - TN2, TN1, EB1
hair - EB8, EB5, TN7
hair ties - DR1
boots - DR1, IG1
hat  - DR1, JG2, IG1
to add some more dimetion I used my IG1 to add some shading to the patterned paper. I also glossy accented the eyes and used some stickles on the rose, the hair ties and the boots (hearts).


On the inside I used the remainder of the cut appart sheet and some more of the pink glitter tape by AC.

Thanks for stopping by and I really appreciate it, if you leave me some feedback...

Samstag, 21. September 2013

Styling Sammy (Wicked Designs)

Todays card share features Styling Sammy from Wicked designs. I kept the card quite simple. For the background I used black card stock that I stamped with the thin chevron stamp from impression obsession in a pink pigment ink. To show of my girl image, I used some pink card stock that I die cut with a Lifestyle Crafts nesting die that I poped up on foam adhesive. I also added some baker's twine in white and pink from AC. With the same pink card stock I cut a fish tail banner and stamped thanks on it (the Stamps of Life).


The spectrum noir colors I used:

skin - FS9, FS4, FS2, CR3
mouth - CR3
eyes - IG8, glossy accents
hair - GB5, GB4, GB1
top - LV2, LV1
vest - TB3, TB2, CT4, waterfall Stickles
trousers - BG8, BG6, BG4
belt - EB8, CT4
shoes - BG6, BG4
bag - BT4, BT3, BT1

Freitag, 20. September 2013

Leisure Lolli (Wicked Designs)

For my card share today I want to show you this card I made with Leisure Lolli from Wicked Designs.
I created the background with two impression obsession stamps: Craquelure and Clouds. I stamped the clouds with Memento Bahama Blue and Summer Sky on Blue card stock and the Craquelure with Memento Bamboo Leaves, Cottage Ivy and Olive Groove on green card stock. For my sentiment I used a stamp from AmyR Be Happy sentiments. I popped my image up on foam adhesive and added some sequins in different sizes to add some sparkle.


Spectrum noir colors:
skin - FS9, FS4, FS2, CR3
tongue - CR7
eyes - TB3
hair - GB5, GB4, GB1
shirt - LV2, LV1
trousers - TB5, TB3
lolli - BP6, BP5, BT1, diamond stickles
hair band - PL2, CT4, diamond stickles

Donnerstag, 19. September 2013

Reading Drew Card (Wicked Designs)

I made a quite simple card with the gorgeous image from Wicked Designs: Reading Drew. For the background I used yellow card stock and the impression obsession cover a card craquelure stamp. I really love those cover a card stamps lately... I used Memento inks in Cantaloupe, Peanut Brittle and Pear Tart. To create the floor, I used wide woodgain washi tape. I cut some banners from blue and red star washi tape and finished it of with a flair badge from Life in bits and pieces.


I colored Reading Drew with my spectrum noirs.

skin - TN2, TN1, EB1
mouth - CR3
eyes - IG8, glossy accents
hair - EB5, TN7, TN5
shirt - DR5, DR1
trousers - TB5, TB3
shoes - TN7, TN5
books - EB1, LG2, LG1

Mittwoch, 18. September 2013

My Style Stamps Cards

Just a quick card share... I used both My Style Stamps set that I have, Sock hop and Wish I was... For both cards I used the Hero Arts/Basic Grey Arrow Background stamp from the True Love Collection.


For the purple card I used Memento Lulu Lavender, Sweet Plum and Elderberry for the background (stamped on purple card stock). I added some woodgrain washi tape on the bottom and added the sentiment also in Elderberry on the top right corner. The sentiment and the girl image are from the Sock hop set. I colored the image with my spectrum noirs some time ago and I forgot to write the colors down... I only can remember, that I added my blender pen to her blouse to create a marbled effect.


For this card I used some blue cardstock and stamped the background stamp in Memento Teal Zeal, Bahama Blue and Paris Dusk. I added the same washi tape, which I find looks fantastic as a floor. The sentiment and frame (both from Stamps of Life) I stamped in Elderberry. To make it look like a sign or wall hanging I added an enemal dot from the Now and then collection by Theresa Collins. The girl is from the Wish I was set and very fun to color. I did forget to write the colors down as well, so I can't tell you which spectrum noir markers I used...

Hope you like my cards for today!


Dienstag, 17. September 2013

Fairy Lyn Card (Wicked Designs)

For this card I created a background using 2 sheets of paper from the faded florals stack from wild rose studio. On the back I marked a point that would be the center of my sun ray. I clipped the 2 sheets together so that I could cut them at once. Then I cut strips from the paper, one at a time and glued them on a scratch paper. Then I cut the paper down to size to fit my card. I added some woodgrain washi tape on the front and on top of that I added the new washi tape from doodlebug designs from their new fall collection (Happy Harvest). I die cut two star circle (spellbinders) shapes out of yellow card stock, one to put my cute image on and one to be able to write a message. The image is from Wicked Designs and is called Fairy Lyn. I colored with my spectrum noir markers and added some (diamond) Stickles to her wings and her boots.


Fairy Lyn
skin - TN2, TN1, EB1
eyes - IG8
mouth - CR3
hair - GB5, GB4, GB1
dress - HB3, HB1
boots - LG2, LG1
wings - LY3, LY1


The inside is actually quite simple, once you have created the sun rays...

Montag, 16. September 2013

My Style Stamps and Paper Smooches card

This is just a quick card share... I made this card using the my style stamps, sock hop for the caddilacs. I colored them with my spectrum noir pens and added glossy accents to the wind shields. For the scene and the sentiment I used the Paper Smooches Metropolis set. I just lightly colored the card with my color pencils. I added some (Diamond) Stickles to the clouds and the hot air balloon.


To add some shine to the windows I used some liquid pearls in Buttercup...

Miss Lily Sakura Card (LBBS)

Today I want to share a birthday card I made yesterday. I used the Miss Lily Sakura from LBBS for my focal point. For the patterned paper I used a sheet from the graphic 45 bird song collection. To make the image pop I used a strip of black card stock and I also cut out a Spellbinders Label Eighteen and went around the edges with a silver marker to separate the label from the strip.


I colored the image with my spectrum noirs.

skin - TN7, TN5, TN3
hair - IG9, IG8, IG2
kimono - CG3, CG2, GB5, GB4
parasol - CR11, CR10, EB5
flowers - TB3, GB5, GB4, DR5

For the inside I just stamped the happy birthday sentiment that I got as a gift for being a club member to the stamp of the month club from  the Stamps of Life with Memento Tuxedo black. I also cut a Spellbinders Tear Drop Circles out of black card stock and stamped a sister stamps Yoshimi in silver pigment ink on it.


Hope you like the card I created!


Samstag, 14. September 2013

DT call for Wicked Designs - My entry...

I just wanted to show you my application for the DT call from Wicked Designs. Brenda the owner and creator of those super cute digi stamps is looking for a design team for the period of October through December. You can check out the details here. For my project I made a card 4x8 inches. I created a scene with some papers from my stash. I used the Summer Pail digi image from Wicked designs. The shells and crab are from Lawn Fawn Critters in the sea. I colored the crab with some gelly roll glaze pens and the shells with the copic clear glitter pen. The fence I die cut from some tan card stock and added some Tim Holtz vintage photo distress ink on top to show off the woodgrain on it (from the die). The die is from MFT (My favorite Things) and is called woodgrain fence (if I'm correct...).


To add some texture and interest to the card I added some ribbon at the bottom. I colored my image again with my spectrum noirs, I used the following colors:

skin - TN2, TN1, EB1
hair - IG9, IG8, IG2
eyes - IG9 (glossy accents)
dress - BP4, BP3
pail - TB3, TB2
shoes - TN5

Freitag, 13. September 2013

My entry for the DT Call for My Style Stams

Hi there!

I just wanted to show you really quick, what I created to apply for the Design Team for My Style Stamps. The owner, Nicole is on the search for a DT for the months of October, November, December and January. She wanted you to show off your coloring and paper piecing skills. So this is the card I created for her DT search:


For the card I used the Echo Park My Girl, The sentiment is from the cut apart sheet and all the papers I used are from there (also for the dresses of the girls). For my stamp I used the CC Designs Sugarplum Sisters stamp. I colored them in with my spectrum noir colors, but I forgot to write them down, so I don't remember which colors I used... Silly me! To finish the card I added some silver glitter tape from AC as well as some roses from WOC.

Summer Pail card (Wicked Designs)

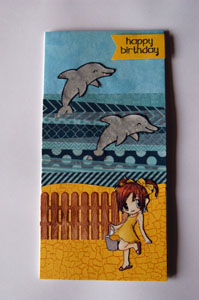
This card I created for a you tube challenge. You had to create a birthday card using the color yellow somewhere on the card. That were actually the only rules to it. For my card I used Summer Pail from Wicked Designs  as the main image. I also used Lawn Fawn Critters in the Sea for the Dolphins and the happy birthday sentiment is from the Stamps of Life (with the Hero Arts shadow ink in navy), which I received as a gift for being in the stamp club. I colored my image with my spectrum noir markers (colors listed below). The dolphins I stamped on grey card stock and fussy cut them out and added some (Diamond) Stickles on them. For the sky I used the impression obsession cloud stamp with menmento summer sky ink and some blue paper I had in my stash. The sea I created with the decorative tapes in blue by My Mind's Eye.

For the sand I used yellow card stock that I stamped with the impression obsession Craquelure in Memento Peanut Brittle. The woodgrain fence is from MFT and I die cut it with tan card stock. To show off the woodgrain pattern, I inked the fence with the Tim Holtz Distress ink in Vintage photo.


Summer pail:
skin - TN2, TN1, EB1
eyes - IG8 & glossy accents
mouth - CR3
hair - EB5, TN7, TN5
dress - CT4, CT2
shoes - TN7
pail - BG4, BG2, glossy accents

Donnerstag, 12. September 2013

Guest Designer at Little Blue Button Stamps! YAY!

I'm a guest designer for Little Blue Buttons Stamps for the month of September, so excited. For my fist project I altered a picture frame. I bought the white frame from IKEA and first added some molding paste on it for texture. I used the TCW 6x6 templates mini time travel and mini ledger as a design. I let it dry and then added some Spray & Sparkle multicolor varnish from Crafters Companion on it. It has ultra-fine glitter in the rainbow colors in it. Then I hotglued the Wedding Jessica on the right side of the frame and added some WOC flowers to complete the look.


I colored the Wedding Jessica with my spectrum noir markers and I used the following colors:
Skin - FS9, FS4, FS2 and CR3 for the blush (and the lips)
Hair -  CT4, CT2 and CT1
Eyes -  TB3
Wedding dress and veil - BT2, BT1 and the blender pen 
Flowers on the veil - TB1
Roses - DR3 and DR1
Leaves - JG2

Hope you like my project!

Dienstag, 10. September 2013

Some more cards

Hi there!

I'm here to share some more cards I made for YT challenges... The first one is a birthday card for a girl who's turing 12. She likes hot pink and black and also fun hair colors... So I colored my image (TGF Gracie) with my spectrum noir pens and made her hair hot pink. I put her on a white card stock oval (cut with a spellbinders oval die) and a lacy oval spellbinders die cut out in pink card stock. To add some interest I used the impression obsession cover a card woodgrain stamp and the hero arts neon pink ink. I added some self adhesive lace to the card base. The background paper is from BoBunny enchanted collection.


To finish the card off, I used some WOC Cherry blossoms and the wood veneer from studio callico, as well as some stickles on some details of the image and the numbers.

The two cards below I made for my twin girls who started pre K just a few weeks ago...


I used some different washi tapes, a pure innocent (by MFT) freckles, the snails2mail stamp set (by The stamps of life) and the flashy alphabet (by Mama Elephant). Naturally I had to add some Stickles... Which girl doesn't like some glitter???!


For this card I also used some washi tape, a paper from the 5th and frolic (Dear Lizzy/AC). The foxes are from Tiddly Inks and I had to use this image, as she really loves foxes and always plays my little fox... I added her name in some sparkly thickers...

I kept those cards quite simple as they are for 3,5 year old girls... So, they get handled a bit and very detailed work is not really appreciated...